 |
| My white pinched-petal sea, just out of the oven!!! |
Wednesday 14 December 2011
Merry Christmas to All!
A little bit of voodoo going on around here, I think! Several months ago, I followed Lindly Haunani's tutorial to make the stunning pinched-petal necklace. At the time, I had half of the black/white core cane left over and it's been sitting about waiting for me to notice it ever since. Over the past few days, I've been making canes (just because it's a fun and calming process!) and tonight I made one that lent itself to the pinched petal cane - so I made it. I put my little petals into the oven 15 minutes ago then sat down to check polymer clay daily - which usually updates at around this time of day. Lo and behold, Cynthia has featured another version of the pinched-petal cane. Spooky!
Anyway, that's not what I wanted to talk about! I just wanted to say thanks for reading this year and to wish everyone a very happy and safe Christmas and New Year. I'll be heading to Melbourne soon to spend Christmas with my family. In the new year, I will be applying myself to the December/January Aussiepolyclayers challenge - "Challenge Yourself" and also to readying my collection for the BrisStyle markets. Bring on 2012!!!
Wednesday 30 November 2011
Full circle
I'm on the circle bandwagon at the moment and I don't think this obsession is going anywhere in a hurry! I am loving circle forms. I started playing with them during the October Aussiepolyclayers "Lace" challenge and many of my designs since then have incorporated circles. The Aussiepolyclayers November challenge, "Rings," is also feeding my habit!!
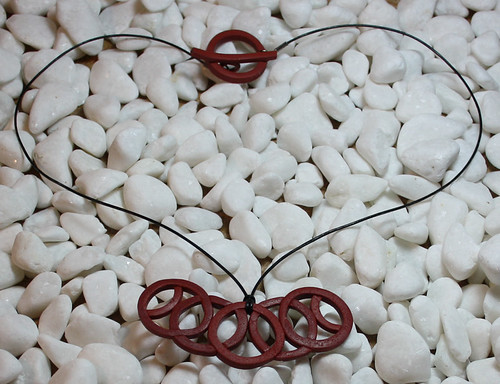
From circle ring forms as in the lace circles earrings (Image 1) or these ring pendants (Images 2 & 3), to circle cutouts as in the "Call Me" pendant based on the old fashioned telephone dial pad (Image 4). I've also played with extruded circle forms, shown in Images 5 & 6.
And my latest piece "Vinyl Cascade" features black rings surrounding a circular cutout inspired by old vinyl records (Image 7)
From circle ring forms as in the lace circles earrings (Image 1) or these ring pendants (Images 2 & 3), to circle cutouts as in the "Call Me" pendant based on the old fashioned telephone dial pad (Image 4). I've also played with extruded circle forms, shown in Images 5 & 6.
 |
| Image 1: Circles earrings |
 |
| Image 2: Corinda Ring pendant |
 |
| Image 3: Stroppel Ring pendant |
 |
| Image 4: 'Call Me' necklace |
 |
| Image 5: extruded circles earrings |
 |
| Image 6: extruded circles ring |
And my latest piece "Vinyl Cascade" features black rings surrounding a circular cutout inspired by old vinyl records (Image 7)
 |
| Image 7: Vinyl Cascade pendant |
Friday 18 November 2011
The Thin Places
This post is a little aside to my usual bantering about polymer clay! This post is about Inishkea, where I got this name for my polymer clay work and my connection with it.
My nana is one of the closest things to my heart. She was born on an island off the west coast of Ireland, named Inishkea North. She now suffers from the debilitating and degenerative Alzheimer's disease and can no longer share all her old stories that I used to love hearing about her childhood and the way they lived. So when I had a chance to investigate and write a creative non-fiction piece last year, I took the opportunity to learn more about the Inishkea islands. I'd like to share it with you as the story of these islands and their community is a sad but intriguing one and you might see how Inishkea has weaved itself into my soul!
The Thin Places
I feel
the keen beat of my yearning heart
as I
launch my curragh and paddle out to
sea
I've
waited in Blacksod for the calm to hold
and now I
make my slow but sure way home
to
Inishkea, I pray the Lord will carry
me back
to the shores of my island free
Through
swell the village rises proud and free
I know
the pattern of the waves by heart
patience,
until the right moment to carry
my
precious load into land from the sea
we
celebrate when finally I'm home
my wife
and children wait for me to hold
We eat
and drink as much as we can hold
the
porter and the poitίn running free
our
friends all come to gather in our home
to hear
the tales that cheer and give us heart
the young
ones dance and over a moonlit sea
our
singing and our laughter seem to carry
When
ships are wrecked we take all we can carry
the wild
Atlantic has us in its hold
we ask
the Namhóg to keep at bay the sea
so we can
fish for mackerel trouble-free
we labour
to survive with all our heart
we
cherish our land and our one-roomed home
I refuse
to pay a tax for my own home
so when
the tax man tries to land and carry
our goods
off, we grow staunch and brave at heart
we herd
our livestock to a central hold
we hide
our goods in caves and then we free
our grips
of stones to drive him back to sea
My son is
going fishing, sure the sea
looks
calm enough as he embarks from home
we think
the night will remain tempest-free
but
fierce winds pick up and roll in to carry
away the
boy we're never again to hold
and his
loss breaks his weary mother's heart
A free
wind guides us over the conquering sea
we carry
our brood and all that we can hold
a new
home, still my heart beats for Inishkea
A row of
ruined houses hints at a village from an era past. Time and tide slowly dissolve the vestiges of
the island community that once dwelled here. Visitors to the islands of Inishkea North and South, where the ruins
lie, feel the eerie serenity that blankets the site. Such calm seems out of place in these
wind-swept surrounds. They strain to
envisage the thriving society that survived here not so long ago. They drink in the poignant beauty of both
land and ruins. And when they leave,
they notice a change. Ever so
slight. Their soul is lighter. Father Kevin Hegarty spoke of 'thin places'
after a visit to the islands in 2007.
The spiritual feel of the area recalled this Celtic idea of sites where
past, present and future seem to combine.
Some call places like this the edge of heaven. Places of solace where our earthly plane
meets something beyond. Strangely appropriate when standing on the islands, you
feel that you are standing at the edges of the earth.
The
Inishkea islands lie a few miles off the coast of the Mullet peninsula in
County Mayo on the western coast of Ireland.
They are low-lying islands, bathed in the Atlantic ocean but are
constantly harried by its winds and waves.
The islands are rich in history and mysticism. Archaeological investigations have revealed
multiple periods of settlement. From the
Bronze Age to the early 20th century.
The islands are littered with remains of religious importance from early
Christian times. These include church
sites, holy wells, burial grounds and cross slabs. Evidence of island settlement again appears
around the late 18th century. And the
island population grew steadily after this period, mostly peopled with
fishermen and farmers from the mainland.
Living
conditions on the islands were harsh.
The Atlantic storms and hurricanes were relentless and made agriculture
difficult. They grazed livestock and
worked to adapt a thin and sandy soil for the growth of potatoes, turnips,
barley, flax and rye. Their lives were
heavily reliant on and based around the sea.
They supplemented both diet and income with the fruits of the sea. They fished for mackerel, herring, bream,
cod, lobster and crayfish in the surrounding waters. They harvested fish oil and seal oil and
collected limpets from the rocks. They burned kelp for extra income over the
winter months.
The
islander spirit was independent, proud and sturdy. Their isolation meant they were an insular
community from the outset. They
developed a true sense of identity with their island culture. Nurtured by their interdependence on each
other for survival. Their society was
founded on their notion of neighbourly love.
Widows and landless neighbours were cared for within and by the
community. They looked out for their
own. They operated as one.
Islanders
tell of how they would come and go from each others' houses in the
evenings. Their days were full of toil
and tasks but their nights were full of friends, family, singing and
storytelling. As such, the islands
developed a unique social order. The
most highly respected among them were the ones that could weave a good tale -
the storytellers. Next in line were
those that had fine singing voices.
Third were those that entertained them all by dancing. Fourth would be the school master or the post
master. And in a lowly fifth place they
held the poor parish priest.
Their
insularity also meant they adhered more to their own moral and legal guidelines
than to those imposed on the mainland.
The islanders were Roman Catholic but they were far from the influence
of their parish priest. They would say
their daily prayers and attend church on the mainland when they could. But when the winds rolled in and the seas
were ferocious, it wasn't the Rosary they gripped as they said their prayers,
it was a carved stone called the Namhóg. No one knows quite how or why this stone was
venerated so. But it's thought the
islanders attributed to it the power of calming the waters. The priest is said to have tried to destroy
the idol on one of his visits.
The
islanders were also out of the way of regulatory bodies and policing. They appointed their own 'King', who was
responsible for external relations. Most
of the islanders avoided paying their taxes.
The tax man simply couldn't land his boat amidst the showering of
stones. And if he did manage it, those
who paid their taxes would claim ownership of all the sheep and cattle. And if he went into a house to claim goods in
lieu of money, he'd find it barren. All
the valuables had been hauled off and were hidden down in caves.
In the
mid-19th century, activities such as piracy, ship wrecking, scavenging and
smuggling were common and accepted practices.
A coastguard was placed on the islands in 1848 to prevent these dangerous
activities from taking hold. The
distilling of illicit liquor from their barley crop became a legendary source
of income and infamy for the islanders - they were renowned for the quality of
their poitίn. So much so that in 1895 a police barracks was
built and manned on the north island to try to impede the practice.
Outside
world influences continued to force their way into the island lifestyle with
the establishment of schools on both islands.
This introduced the younger ones to the English language and opened them
up to the world outside their little community.
They started to look externally for help and when these endeavours were
successful, relief was more frequently sought from the government in times of
distress. Government emigration schemes
saw young people or sometimes whole families leave for America.
In 1927,
on the evening of 28th October, a sudden hurricane caught fisherman all along
the west coast of Ireland off-guard. The
story is told that though the day was stormy, a calm befell at dusk. Many made
the choice to go out in their curraghs
and get their fill of fish. Some of the
older, more experienced men turned back in time. But many did not. Forty five were lost that night, ten of them
from Inishkea. Most in their teens or
early twenties. Two years later, two
more north island fishermen were drowned at sea.
In a
community hit hard by the tragic loss of their young men, people began to feel
that life would go easier for them on the mainland. Both church and state wanted this marginal
community back within their reach. So
when the islanders petitioned the government for holdings on the mainland, they
did all they could to accommodate their needs.
Most were granted acreage in Surgeview, with views to the islands and
access to their fishing grounds.
When the
last of the islanders of Inishkea left in 1934, they took with them the spirit
of Inishkea life. They carried on a love
of tales and song and dance, they passed this to their children and their
children's children. Their little houses
left behind now tell a tale of their own, as the turbulent Atlantic gradually repossesses
them. But a glimmer of hope shines
through for the future of the islands.
Descendants of Inishkea families return and a few of the old ruins on
the south island have been rebuilt as holiday homes. Yet another new incarnation in the ebb and
flow of life on the Inishkeas. People
will always be drawn to the thin places.
Thanks!
Thanks for taking the time to read this piece about Inishkea. I'd like to say a very special thank you to my grandmother, Sheila Flynn who has instilled in me this love and awe for Inishkea and its people and shared her stories of life growing up in the region. Thanks to my parents, Roger and Liz Flynn who helped me in my research for this piece and even trekked across Ireland to get me the out-of-print book by Brian Dornan on the Inishkeas!! Thanks to my cousin Sarah Ashton for our road trip to the Mullet peninsula so many years ago! And most especially thank you to my dad's cousin Ann Lavelle, who shared with my mother a letter detailing her notes on island life and history from her own research and speaking with my nana's siblings.
References
Coman, BJ 2005, 'The
Last of His Tribe: Maurice O'Sullivan and the Blasket Islanders', Quadrant, 1 March.
Dornan, B 2000, Mayo's Lost Islands: The Inishkeas, Four
Courts Press Ltd, Dublin.
Dunne, A 2010, 'Lost
at sea', Irish Times, 3 July 2010, Newspaper
Source, EBSCOhost.
Hegarty, K 2007, 'Oh, to be on Inishkea', Mayo News, 14 August.
McNulty, A 2008, 'Beautiful
Isles', Mayo News, 5 August.
O'Crohan, T 1986, Island Cross-Talk, Oxford University
Press, Google Books.
O'Sullivan, M 1953, Twenty Years A-Growing, Oxford
University Press, Google Books.
Royle, SA 2003, 'Exploitation
and celebration of the heritage of the Irish islands', Irish Geography, vol. 36, no. 1, pp. 23-31.
The National Archives
of Ireland, Census of Ireland 1901/1911, <http://www.census.nationalarchives.ie/>.
Wyatt, M 2008, How to Write a Sestina, suite101.com,
<http://writing-poetry.suite101.com/article.cfm/how_to_write_a_sestina>.
Sunday 13 November 2011
Getting closer to brisStyle!!!
This weekend, I've taken some big steps forward in my quest to join brisStyle. BrisStyle is an Etsy street team that brings together artists, crafters and designers who live in or near Brisbane and love to make handmade items. They hold various markets throughout the year where members fill stalls with their unique handmade goods and I've been looking forward to joining in the fun for a few months now.
In order to join brisStyle, you need to own an Etsy shop. So the first thing I had to do was to get my Etsy shop up and running and list at least ten items for sale. Now that I have my lighthouse, I've been able to get some really good quality photos and I used these to illustrate my items along with little descriptions including sizes. I had no idea how to price my items for this so I guess I'll just have to see how it all goes and adjust pricing as necessary.
But I'm excited to be able to show you my Etsy!! And I've now inquired about joining brisStyle - yay!
The other thing I decided to do was to give Inishkea its own Facebook page. That way, any friends or fans that want updates on new items, sales or where Inishkea items will be sold can 'like' the page and get my news feed. Hopefully this will make it easier for me to keep my friends and customers updated! You can check out the FB page here.
And now that all that is done, I can finally sit down to my clay table and do the really fun stuff :P
Monday 7 November 2011
Stroppel Wildfire
Here are links to some of my favourites:
Pavla Cepelikova used it on a hollow bead.
Cara Jane used a limited palette and white in her cane!
Rocky used it to make beautiful flower brooches.
Randee M. Ketzel has been busily making cool bangles and a tile bracelet.
Love the colours in Julie Doust's versions.
And of course Alice Stroppel herself is using the cane to dress her lovely girls!!!
There are so many more gorgeous examples, just google Stroppel Cane to find more!
And here are some of the things I've made with my first attempts at Stroppel Canes:
 |
| Stroppel Wildfire |
 |
| Stroppel Rings |
 |
| Stroppel Bead Necklace |
 |
| Organic Stroppel Earrings |
 |
| My new favourite earrings ;) |
Anyway, I adore this cane and have really enjoyed watching it spread throughout the polymer clay community. Thank you Alice Stroppel for your genius, creativity and generous spirit :D
Lighthouse
I've been knocking up a photo box to get a better lighting set up for photos of my jewellery, I call it my lighthouse. Cue one of my fave songs "Lighthouse" by The Waifs, that's what's playing in my head while I'm sawing and hammering away! I picked up some short lengths of timber, MDF and nails from Bunnings and a couple of white shower curtains from the cheapie shop. I made the box frame using the timber then nailed the MDF to the bottom and back surfaces. Then I cut up the shower curtain and glued it to the timber...eh voila...a home-built light box! I left the front and top open so photos could be taken from these two angles.
 |
| Image 1: My completed lighthouse!! |
Logo-licious!
Inishkea has a logo!!! My husband Todd and I came up with the idea for this and then he drew it up for me. The smaller one (Image 1), for earring cards and avatars, consists of an "I" on a round polymer clay bead. The larger one (Image 2) extends this to the full word "Inishkea," for banners and when I want the full name displayed. I'm so excited to have such a beautiful logo for my polymer clay collection! Thanks honey!!
 |
| Image 1: Inishkea logo (small) |
 |
| Image 2: Inishkea logo (large) |
Sunday 23 October 2011
Adventure #15: Inishkea - Explorations in polymer clay
I have finally settled on a name for my polymer clay work..."Inishkea." Named for the island where my beautiful nana was born. The Inishkeas are two small islands off the coast of the Mullet peninsula in county Mayo, Ireland. The history of the islands is rich and intriguing and I couldn't think of a better name for my explorations in polymer clay! As such, I have also decided to re-title my blog "Inishkea - explorations in polymer clay." The old title wasn't really working for me any more as I don't seem to be doing much bead work but more really delving into different ways of using clay to express my ideas. So I hope you continue enjoying the blog under the new title!!
Adventure #14: Leather & Lace
For October, the Aussiepolyclayers challenge is 'lace'. The challenge is hosted by Esme, who's done an amazing job getting together inspirational links and tutes. See here for more details.
Esme defines lace as "any openwork structure whose pattern of spaces is as important as the solid areas." This revised definition of lace opened my mind to the possibilities of lace polymer clay work and inspiration followed, especially after a visit to the Powerhouse museum 'Make lace not war' exhibition website link included in Esme's post.
My first entry is entitled 'Celtic Lace' (Image 1). I've played with a few ways of using circles to make a lace effect. I combined orange and copper clay to get the lovely colour then used my extruder to make a long square 'snake' which was then cut up and moulded around a circular cookie cutter to get the round shapes. My mother-in-law loved it so much that she ordered a smaller version for herself! You can see that one here.
My second piece is a layered bangle (Image 2). The first layer is a solid black base, the second layer is a pretty skinner blend and the third layer is another thin black layer with lacey patterns cut out using tiny cookie cutters. I coated the bangle with pearlex varnish - I was pleased with the end result!
The third piece is inspired by one of my favourite songs "Leather and Lace"...love Stevie Nicks! Here I wanted to explore using lace to string a neckpiece. The pendant is based around the idea of two very different people standing face to face and finding what they need in each other...finding a strong and enduring love with each other. It is strung on both leather and lace! And capped off with a handmade S-clasp (Image 3).
The fourth piece is a wireworked neckpiece with delicate white polyclay flower shapes with a lacey pattern through both the clay chips and the wirework (Image 4).
Last and definitely least are these earrings (Image 5) made from some extruded clay circles (again playing with circles in getting lacey effects!).
And I'm spent! What a great challenge this has been, I've thoroughly enjoyed maself :P Check out the entire challenge thread here to see what amazing things the aussiepolyclayers are doing with lacey polymer clay.
Esme defines lace as "any openwork structure whose pattern of spaces is as important as the solid areas." This revised definition of lace opened my mind to the possibilities of lace polymer clay work and inspiration followed, especially after a visit to the Powerhouse museum 'Make lace not war' exhibition website link included in Esme's post.
My first entry is entitled 'Celtic Lace' (Image 1). I've played with a few ways of using circles to make a lace effect. I combined orange and copper clay to get the lovely colour then used my extruder to make a long square 'snake' which was then cut up and moulded around a circular cookie cutter to get the round shapes. My mother-in-law loved it so much that she ordered a smaller version for herself! You can see that one here.
 |
| Image 1: "Celtic Lace" |
My second piece is a layered bangle (Image 2). The first layer is a solid black base, the second layer is a pretty skinner blend and the third layer is another thin black layer with lacey patterns cut out using tiny cookie cutters. I coated the bangle with pearlex varnish - I was pleased with the end result!
 |
| Image 2: Layered Lace Bangle |
The third piece is inspired by one of my favourite songs "Leather and Lace"...love Stevie Nicks! Here I wanted to explore using lace to string a neckpiece. The pendant is based around the idea of two very different people standing face to face and finding what they need in each other...finding a strong and enduring love with each other. It is strung on both leather and lace! And capped off with a handmade S-clasp (Image 3).
 |
| Image 3: "Leather & Lace" |
The fourth piece is a wireworked neckpiece with delicate white polyclay flower shapes with a lacey pattern through both the clay chips and the wirework (Image 4).
 |
| Image 4: Delicate White Lace Necklace |
Last and definitely least are these earrings (Image 5) made from some extruded clay circles (again playing with circles in getting lacey effects!).
 |
| Image 5: "Circles" earrings |
And I'm spent! What a great challenge this has been, I've thoroughly enjoyed maself :P Check out the entire challenge thread here to see what amazing things the aussiepolyclayers are doing with lacey polymer clay.
Tuesday 11 October 2011
Adventure #13: My Grand Canyon
 |
| Image 1: The Grand Canyon bead in all its ugly glory! |
 |
| Image 2: Successful bubble bead #1 |
 |
| Image 3: Successful bubble bead #2 |
Monday 19 September 2011
Adventure #12: Geeking Out!
I am a massive fan of the The Lord of the Rings books and movies. The movie room we're building will be a shrine to the story, with figurines from the movies in niches above the TV and replica swords as door handles on the DVD cabinets. And our most beloved burmese cat is named for the eccentric wizard, Gandalf.
I have wanted my own replica of Arwen's necklace, the Evenstar, for a long time. And I finally felt now was the time to have a go at making one from polymer clay (Image 1). I used silver Kato clay and for the back part, made my first mica shift to get those lined effects. I also used my lovely new Makins extruder to get the backbone of the piece so perfectly round. I am very proud of my Evenstar and now can't wait to get a chain and wear it around in all my geekdom glory!!!
While I was on the geek-train, my hubby asked me to knock up a Green Lantern ring for him (Image 2). I had to wrap paper around my ring mould a few times to make it big enough!
I have wanted my own replica of Arwen's necklace, the Evenstar, for a long time. And I finally felt now was the time to have a go at making one from polymer clay (Image 1). I used silver Kato clay and for the back part, made my first mica shift to get those lined effects. I also used my lovely new Makins extruder to get the backbone of the piece so perfectly round. I am very proud of my Evenstar and now can't wait to get a chain and wear it around in all my geekdom glory!!!
 |
| Image 1: The Evenstar replica in silver polymer clay |
While I was on the geek-train, my hubby asked me to knock up a Green Lantern ring for him (Image 2). I had to wrap paper around my ring mould a few times to make it big enough!
 |
| Image 2: Green Lantern replica ring |
Adventure #11: Colour Me Happy!
I finally feel like I'm getting somewhere with choosing and mixing my own colour combinations. I've been working through Lindly Haunani and Maggie Maggio's book Polymer Clay Color Inspirations. The pivot tiles exercise has been invaluable, allowing me to see how different colours shift each other and get a much better idea of how to go about mixing certain colours (Image 1). And I have loved creating my own colour collages, giving me pallettes to work from in my projects. Here is the stunning necklace I created using the pinched petal necklace exercise in the book (Image 2) - taking the colours from my first collage (Image 3).
 |
| Image 1: Colour pivot tiles using packet Kato clay colours |
 |
| Image 2: Pinched-petal neckalce |
 |
| Image 3: My first colour collage, made for working through the projects in Polymer Clay Color Inspirations |
Adventure #10: Mrs. Jo Bangles
So I wanted to make something spesh from polymer clay for my good mate Jo for her birthday. It had to be a bangle, something a bit funky. I got practicing and before I knew it, I was smack bang in the midst of a bangle-making frenzy! And every time I sat down to my clay table to try something new, that old song Mr. Bojangles would start up in my head!!
The first thing I had to do was find a mold to make the right sized base. My hubby found me skulking about in the kitchen pantry looking at various tinned goods with a maniacal gleam in my eye.....
I have used food tins, drink cans and scone cutters to make various sizes of bangles. As well as covering a wooden blank from a craft shop and metal eggrings with polymer clay.The first thing I had to do was find a mold to make the right sized base. My hubby found me skulking about in the kitchen pantry looking at various tinned goods with a maniacal gleam in my eye.....
Jo's bangle (Image 1) was made by paneling rectangular kaleidoscope cane cutouts onto a baked clay base and then laying a thin layer of clay over the edges. I've since used the same technique to make a few more bangles (Images 2 & 3). Deb Crothers kindly provided me with her own tutorial for making sculpted eggring bangles - these are just so fun to make, you can really add just about anything you want to them. This is definitely one of the most fun things I've tried in clay techniques (Images 4 & 5). Since writing this post, Debbie Crothers' sculpted bangle tutorial has been published in Australian Beading Magazine. Do yourself a favour and check it out!!
 | |
| Image 1: Polymer clay bangle made with kaleidoscope cane panels |
 |
| Image 2: The first kaleidoscope bangle I made - my mould was a bit too big! |
 |
| Image 3: I've since made another version using an extruded cane to make the panels (this was my birthday present to myself...I'm good to myself, aren't I?!) |
 |
| Image 4: Sculpted eggring bangle with playful dolphins |
 |
| Image 5: Sculpted eggring bangles - mum's birthday present!!! |
Friday 26 August 2011
Adventure #9: Dare to Dream
I found myself landed with a quite difficult project at work earlier this year. I'm working up a technology that no one else at our institute is using. It's made for a frustrating time, especially over the last two months - long hours, crazy time points and mediocre results. On top of this, my hubby and I are trying to finally finish renovating our back room (it's only been three years!!) I've found the clay table has really kept me grounded and stopped me pulling my hair out over work and all my other commitments! In the midst of all this, I received a message from Deb Crothers, who runs the Aussiepolyclayers forum. She was giving all the new people to the forum a gentle nudge to think about entering the 2011 Aussiepolyclayers forum competition.
When I read through the thread about the comp and saw all the effort Deb especially had put into organising this comp, I could not say no! I knew I had to put an entry in, even though there was only 5 weeks until the comp closed. The theme was "Dare to Dream" and my mind immediately started taking me to fantasy lands where mermaids swim free, tree-folk come out at night and heroes vanquish the dark forces of evil that threaten the land........I thought of enchanted forests and Alice in Wonderland.......and eventually my mind rested on what "Dare to Dream" really means to me. I remembered the first time I ever felt I could dream big and achieve anything I set my mind to. It was when I graduated from my honours degree. I remembered the card my aunty gave me that said "Shoot for the stars, if you fall short you may land on the moon." I always think of this quote when that nasty self-doubt starts creeping in, it takes me back to that feeling I had then - it gives me hope and confidence.
I wanted to make a piece of jewellery that would depict this quote and this idea. So, using stars and moons as the main theme, I started playing! I wanted to use blues/greens as the colour scheme to relate the calming qualities of the moon. I knew the boldness of the piece would come out in the design rather than the colours. My first attempts were pendants (Images 1 & 2).
Then I played with making 3-D stars and moons (Image 3). I love these star beads, I used the Starry Nights cane tutorial by Donna Kato. But my husband said they looked more like Morning Stars (Image 4)....which is entirely TRUE!!! Damn - back to the drawing board!
I then made a lovely skinner blend in soft pearly blues and greens and started playing with this, making different shaped beads (Image 5), mostly using Donna Kato's overlay bead method and cookie cutters.
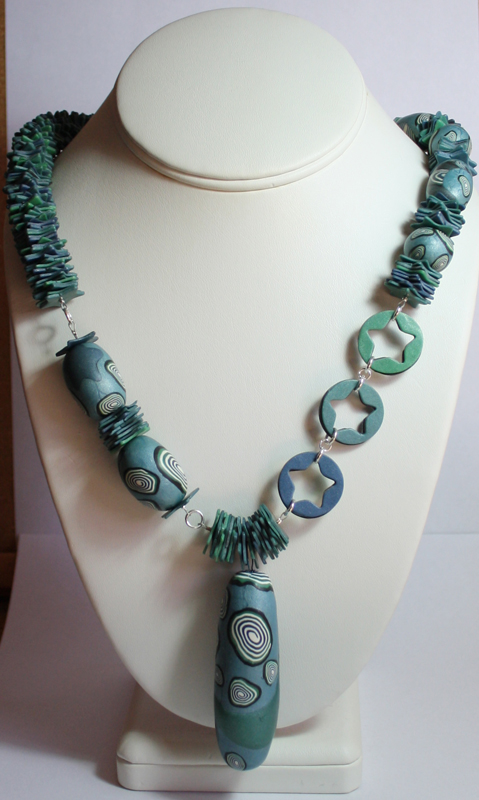
Finally I composed my piece...my original idea was to wirework it randomly and make a star-spangled necklace but my beads leaned more towards a strung necklace style and when I was playing with the little star cutouts, I had a few of them strung together and thought they looked wicked and felt nice against your skin! And so I made heaps more of them and made them the backbone of the piece with the moon toggle clasp and focal bead as features. Here is the finished piece:


The competition ended on July 31st, with the judges deliberating and making their decision by the 14th August. And eventually, after what seemed like forever, we got to see all the entries! I was absolutely blown away by each and every entry into this competition. The theme was so broad and everyone had such different interpretations, that alone was amazing but the quality and time and thought put into these pieces were nothing short of phenomenal. Check them out here. And the first, second and third prize winning entries can be seen here. As well as the two encouragement award entries. I am extremely proud to have won one of these encouragement awards for my piece "Reach for the Stars"!
Applying myself to this competition definitely helped me through a stressful couple of months and at the end of it all, to win a prize was just amazing and has made me a very happy and 'encouraged' little clayer!!
When I read through the thread about the comp and saw all the effort Deb especially had put into organising this comp, I could not say no! I knew I had to put an entry in, even though there was only 5 weeks until the comp closed. The theme was "Dare to Dream" and my mind immediately started taking me to fantasy lands where mermaids swim free, tree-folk come out at night and heroes vanquish the dark forces of evil that threaten the land........I thought of enchanted forests and Alice in Wonderland.......and eventually my mind rested on what "Dare to Dream" really means to me. I remembered the first time I ever felt I could dream big and achieve anything I set my mind to. It was when I graduated from my honours degree. I remembered the card my aunty gave me that said "Shoot for the stars, if you fall short you may land on the moon." I always think of this quote when that nasty self-doubt starts creeping in, it takes me back to that feeling I had then - it gives me hope and confidence.
I wanted to make a piece of jewellery that would depict this quote and this idea. So, using stars and moons as the main theme, I started playing! I wanted to use blues/greens as the colour scheme to relate the calming qualities of the moon. I knew the boldness of the piece would come out in the design rather than the colours. My first attempts were pendants (Images 1 & 2).
 |
| Image 1: Stars and Moon Pendant |
 |
| Image 2: Stars and Moon Pendant |
Then I played with making 3-D stars and moons (Image 3). I love these star beads, I used the Starry Nights cane tutorial by Donna Kato. But my husband said they looked more like Morning Stars (Image 4)....which is entirely TRUE!!! Damn - back to the drawing board!
 |
| Image 3: 3-D stars and moon beads |
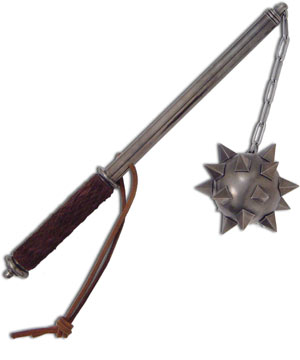 |
| Image 4: A morning star weapon - remarkable likeness to beads above - damn! |
I then made a lovely skinner blend in soft pearly blues and greens and started playing with this, making different shaped beads (Image 5), mostly using Donna Kato's overlay bead method and cookie cutters.
 |
| Image 5: components made using blue/green skinner blends |


The competition ended on July 31st, with the judges deliberating and making their decision by the 14th August. And eventually, after what seemed like forever, we got to see all the entries! I was absolutely blown away by each and every entry into this competition. The theme was so broad and everyone had such different interpretations, that alone was amazing but the quality and time and thought put into these pieces were nothing short of phenomenal. Check them out here. And the first, second and third prize winning entries can be seen here. As well as the two encouragement award entries. I am extremely proud to have won one of these encouragement awards for my piece "Reach for the Stars"!
Applying myself to this competition definitely helped me through a stressful couple of months and at the end of it all, to win a prize was just amazing and has made me a very happy and 'encouraged' little clayer!!
Friday 12 August 2011
Adventure #8: One ring to rule them all
I'm obsessed with making polymer clay rings at the moment. I bought a gorgeous millefiori ring in Venice. Wore it all the time. Loved it. Then I left it lying around the house somewhere as I do, and it got crushed...dead :( I'm now trying to get the same comfortable ring design in a pc ring. My first attempt ended up like this:

It was too long and only baked for 10 minutes, so it was quite brittle. The second attempt was better, but I rebaked it to add some strength and it ended up deforming quite a bit. I scolded my little fingers holding it together until it cooled but it ended up still larger than it had been and way too big for me, which is annoying because I really like it!!

For these first two rings, I was using a wooden dowel as a mold, but I didn't like the texture it left on the inside of the ring. I found a metal spoon in Kmart (<3 the kitchen section!) with the right sized handle and used that as a mold for these rings:


When the sneaky rubber hiding inside the handle melted, the spoon deformed and that's how I found it when I went to retrieve my rings. I managed to remove all the rubber and dissemble the spoon so I ended up with this awesome ring mold - exactly the right size! Now I'm in ring-making heaven...and I just can't seem to stop making them....someone STOP ME!!!!!!!!!!!!!!!
Friday 22 July 2011
Adventure #7: Makin' Do
Have I mentioned that I love working with polymer clay?! Here's another reason: you don't need a truckload of fancy equipment to create really beautiful items, you can often 'make do' with tools you have lying around the house.
That doesn't necessarily mean you spend any less money on this craft. It just means those aisles and sections perhaps little heeded before clay took over your life, like kitchenware, are now a wonderland before your very eyes. They are filled with intrigue and the allure of possibility!
I have commandeered so many things from the kitchen or kitchen aisles since starting this little journey: bamboo and metal skewers, oven and cake trays, a collander, egg rings, cookie cutters, my pasta machine, oven timer, the corn flour (!), foil and baking paper
Image 1 below is makin' do at its best! The tutorial for these wicked looking beads is in Carol Blackburn's book Making Polymer Clay Beads. In the tutorial she uses a clay extruder tool to make the snakes. In the absence of an extruder, I just rolled the snakes of clay from a skinner blend by hand and applied these to the beads. Sure, it was probably a lot more fiddly than if I had an extruder and my snakes are nowhere near perfect, but I think it adds some charm! I made this bracelet for my awesome honours student, Marcela, for her 21st birthday.

Monday 11 July 2011
Adventure #6: Totally Organic
Aussiepolyclayers is a great online forum which brings together polymer clay artists from around Australia and beyond. They bounce ideas and advice off each other and have a very friendly, helpful and active member base.
They often have member challenges and for the months of June and July, Zarina has hosted a challenge with the theme "Organics". What better way to find inspiration and motivation to create outside the box, than to apply a theme suggested by someone else and have a timeline to work to!
So my head has been full of organics all week and I've been busily drawing out design ideas and thinking of the many ways this theme could be interpreted. I thought it would be cool to make earrings in the shape of a tree, but who would really want to wear a couple of trees dangling from their ears?!They often have member challenges and for the months of June and July, Zarina has hosted a challenge with the theme "Organics". What better way to find inspiration and motivation to create outside the box, than to apply a theme suggested by someone else and have a timeline to work to!
What about a pair of earrings with leaves seemingly falling down them - that could look pretty and very organic :) So I set about working out how to make a cool looking leaf out of clay. Molds? Cookie-cutters? Canes? While I was mulling over my options, my eyes fell upon a gorgeous L'Occitane soap my mum gave me when she visited in May (Image 1). I just love the shape of this soap and it smells mmm-mmm-yum! So I decided to make my leaves in the shape of this soap with little clay leaves falling down.
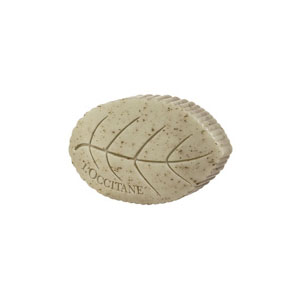 |
| Image 1: L'Inspiration |
To make the clay grainy, I added gold powder and worked it into the clay. I cut the leaf shape with a zigzag blade and impressed a veined craft leaf into the surface of each side of the leaf. I brushed the surface with more gold powder, then baked. I applied a finishing coat of Kato liquid clay. The small leaves were cut out manually from a thin sheet of clay and then impressed with the craft leaf as well. You can check out my challenge entry here (my forum name is Bestie) and make sure you have a stroll through the whole post to have a look at other clayers' amazing work and different interpretations on the theme 'Organics.'
While still thinking 'organically,' I started playing with form, making a squiggly slug of a bead (Image 2) and then, without knowing what I did, I made my favourite-thing-in-the-world-right-now (Image 3). It's a fake rock-like thing. I made it using the principles in Donna Kato's 'Translucent Overlay Beads' tutorial in her The Art of Polymer Clay Millefiori Techniques book. I used two translucent stripey canes and a translucent cane over a dark blue pearl base. For the backing, I used black clay mixed with pearl, which gave this really nice gunmetal colour. After baking, I hand sanded the 'rock' to a smooth finish.
 |
| Image 2: Sluggish bead |
 |
| Image 3: My beautiful feathery-smooth rock |
Now, why I love this thing so much, I'm not sure. I think it's the feel of it. Or the look of it. Or some combo of the two. Perhaps it's really just the whole vibe of the thing ;) but I love my rock and I don't care who knows it!
Subscribe to:
Posts (Atom)