I have finally settled on a name for my polymer clay work..."Inishkea." Named for the island where my beautiful nana was born. The Inishkeas are two small islands off the coast of the Mullet peninsula in county Mayo, Ireland. The history of the islands is rich and intriguing and I couldn't think of a better name for my explorations in polymer clay! As such, I have also decided to re-title my blog "Inishkea - explorations in polymer clay." The old title wasn't really working for me any more as I don't seem to be doing much bead work but more really delving into different ways of using clay to express my ideas. So I hope you continue enjoying the blog under the new title!!
Sunday 23 October 2011
Adventure #14: Leather & Lace
For October, the Aussiepolyclayers challenge is 'lace'. The challenge is hosted by Esme, who's done an amazing job getting together inspirational links and tutes. See here for more details.
Esme defines lace as "any openwork structure whose pattern of spaces is as important as the solid areas." This revised definition of lace opened my mind to the possibilities of lace polymer clay work and inspiration followed, especially after a visit to the Powerhouse museum 'Make lace not war' exhibition website link included in Esme's post.
My first entry is entitled 'Celtic Lace' (Image 1). I've played with a few ways of using circles to make a lace effect. I combined orange and copper clay to get the lovely colour then used my extruder to make a long square 'snake' which was then cut up and moulded around a circular cookie cutter to get the round shapes. My mother-in-law loved it so much that she ordered a smaller version for herself! You can see that one here.
My second piece is a layered bangle (Image 2). The first layer is a solid black base, the second layer is a pretty skinner blend and the third layer is another thin black layer with lacey patterns cut out using tiny cookie cutters. I coated the bangle with pearlex varnish - I was pleased with the end result!
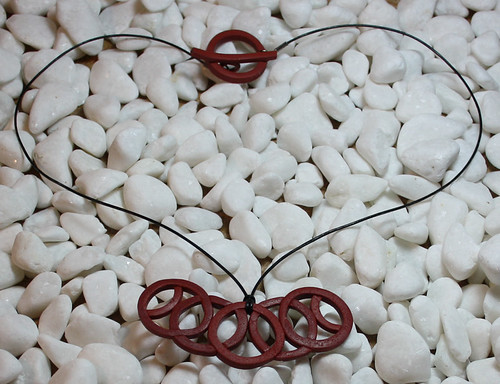
The third piece is inspired by one of my favourite songs "Leather and Lace"...love Stevie Nicks! Here I wanted to explore using lace to string a neckpiece. The pendant is based around the idea of two very different people standing face to face and finding what they need in each other...finding a strong and enduring love with each other. It is strung on both leather and lace! And capped off with a handmade S-clasp (Image 3).
The fourth piece is a wireworked neckpiece with delicate white polyclay flower shapes with a lacey pattern through both the clay chips and the wirework (Image 4).
Last and definitely least are these earrings (Image 5) made from some extruded clay circles (again playing with circles in getting lacey effects!).
And I'm spent! What a great challenge this has been, I've thoroughly enjoyed maself :P Check out the entire challenge thread here to see what amazing things the aussiepolyclayers are doing with lacey polymer clay.
Esme defines lace as "any openwork structure whose pattern of spaces is as important as the solid areas." This revised definition of lace opened my mind to the possibilities of lace polymer clay work and inspiration followed, especially after a visit to the Powerhouse museum 'Make lace not war' exhibition website link included in Esme's post.
My first entry is entitled 'Celtic Lace' (Image 1). I've played with a few ways of using circles to make a lace effect. I combined orange and copper clay to get the lovely colour then used my extruder to make a long square 'snake' which was then cut up and moulded around a circular cookie cutter to get the round shapes. My mother-in-law loved it so much that she ordered a smaller version for herself! You can see that one here.
 |
| Image 1: "Celtic Lace" |
My second piece is a layered bangle (Image 2). The first layer is a solid black base, the second layer is a pretty skinner blend and the third layer is another thin black layer with lacey patterns cut out using tiny cookie cutters. I coated the bangle with pearlex varnish - I was pleased with the end result!
 |
| Image 2: Layered Lace Bangle |
The third piece is inspired by one of my favourite songs "Leather and Lace"...love Stevie Nicks! Here I wanted to explore using lace to string a neckpiece. The pendant is based around the idea of two very different people standing face to face and finding what they need in each other...finding a strong and enduring love with each other. It is strung on both leather and lace! And capped off with a handmade S-clasp (Image 3).
 |
| Image 3: "Leather & Lace" |
The fourth piece is a wireworked neckpiece with delicate white polyclay flower shapes with a lacey pattern through both the clay chips and the wirework (Image 4).
 |
| Image 4: Delicate White Lace Necklace |
Last and definitely least are these earrings (Image 5) made from some extruded clay circles (again playing with circles in getting lacey effects!).
 |
| Image 5: "Circles" earrings |
And I'm spent! What a great challenge this has been, I've thoroughly enjoyed maself :P Check out the entire challenge thread here to see what amazing things the aussiepolyclayers are doing with lacey polymer clay.
Tuesday 11 October 2011
Adventure #13: My Grand Canyon
 |
| Image 1: The Grand Canyon bead in all its ugly glory! |
 |
| Image 2: Successful bubble bead #1 |
 |
| Image 3: Successful bubble bead #2 |
Subscribe to:
Posts (Atom)